Consordinis articles are written by musicians who independently research, test, and recommend the best instruments and products. We are reader-supported. When you purchase through links in our articles, we may earn an affiliate commission.
This guide will take you on a journey to make your very first beat. You’ll learn how to compose, record, arrange, mix, and master a beat using a DAW and various plugins. I’ll be using Ableton Live 10 to create today’s beat, but the concepts and steps used here apply to any DAW. Let’s begin!
If you’d like to work alongside this guide, MIDI and audio files from this tutorial can be found here.
Before We Begin
You will need:
- A computer
- Good-quality headphones or studio monitors
- A DAW of your choice that you know how to use
- A MIDI keyboard (optional)
- Instrument plugins
- Mixing/mastering plugins
Plugins and software I’ll be using:
- Ableton Live 10
- Native Instruments Massive
- Infected Mushroom Wider
- MeldaProductions MMultianalyzer
- Credland Audio Pink
- Ableton’s stock EQ Eight
- Ableton’s stock Compressor
- Ableton’s stock Reverb
- iZotope Ozone
The Preliminary Details
For this beat, I’ve decided to set up my DAW so that the beat will be in 4/4 time and the tempo will be 140 BPM. Most (if not all) DAWs will have an area where you can change the tempo, turn on a metronome, and change the time signature in plain view so you don’t have to go searching through the project settings.

Now that the tempo and time signature has been set, we can begin organizing things.
Organizing the Project
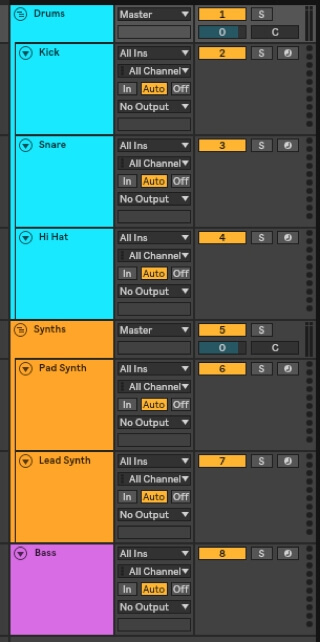
It’s extremely important to organize your project first so that your DAW doesn’t become cluttered and you know where everything is. This ensures that you don’t get distracted or confused while making music.
I’m going to start by adding several MIDI tracks into the project, and then I’m going to label them and color code them, and finally group them together if I need to.
I have an idea of what instruments I’d like to have in my song already: a few drums (kick, snare, hi hat), two synths (a pad and a lead), and a bass synthesizer. Keeping it simple is what works best for me.
Here is what the set up tracks look like, properly labelled, color coded, and grouped. Now it’s time for composing.
Composing
I usually compose electronically, using MIDI. MIDI is a language that allows computers, musical instruments and other hardware to communicate.
I can enter MIDI notes into a piano roll, and my DAW will then send the MIDI note information to an instrument plugin of my choice, which will then turn the MIDI notes into music.
If you have a MIDI keyboard, you can use that to compose, or if you don’t have one, you can just enter the notes manually with your mouse.
Composing the Chords
Today I’m going to start out making the chords for this song, so I will choose an instrument to use in the Pad Synth track. I will use Native Instruments Massive synthesizer and choose a preset from a preset pack that I bought online.
Feel free to use whatever instrument you’d like, whether it’s a stock synthesizer or a third party one like Massive. If you’d prefer to start building a drum track first, skip to the drum section below and then come back to this section when you’re ready to do your chords.
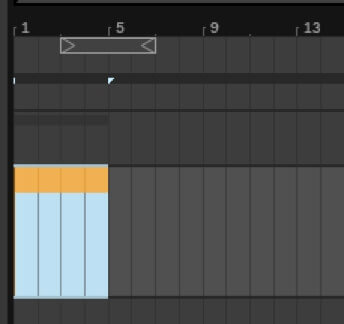
Now let’s create an empty spot in the track display of the Pad Synth track so that we can input some MIDI notes after choosing an instrument. You can double click in the track display and that will create an empty area for a MIDI loop.
You can drag the edges of the empty area to expand the length of the track/loop. I’m going to make mine span four bars for now.
Let’s arm the track so that we can hear what sound we’re using. Arming the track just means that you’re enabling the track to record and allowing sound to go through it from MIDI notes to an instrument plugin, and finally to your speakers or headphones.
The button to arm the track is usually a red button that looks similar to a “record” button.

The track is now armed and I can hear the notes from my keyboard being played through Massive.
Once you select a sound from your synthesizer, it’s time to start adding the notes to the empty MIDI area. You can either do this by hitting the record button and then entering the notes by playing them on your MIDI keyboard or computer keyboard, or you can enter them in manually by using the pencil tool in the piano roll. I’m going to enter them in with the piano tool.
I’ve decided that I’ll do a simple chord progression in the key of Dm, with the chords Dm, Em, F, and Em. Be sure to stay on the lookout for future articles on music theory and how to form chords and chord progressions.

Composing the Drums
Next, I usually like to do the drums. I also use MIDI for drums and I use a sampler plugin that will play the individual drum sound every time a MIDI note is read in the track display of each individual drum.
If your DAW doesn’t have a sampler, you can use a normal audio track and insert the drum clip into the track display wherever you need the drum to play.
Let’s start with the kick drum. I’m going to arm the kick drum track, double click in the track display to create a new empty spot for MIDI notes, and then choose a kick drum sound from my library of drum sounds.
In Ableton, this automatically puts the audio clip into the sampler plugin and that’s how you enter the drums in via MIDI. If you don’t have Ableton, you’ll need to open whichever sampler plugin you use manually.

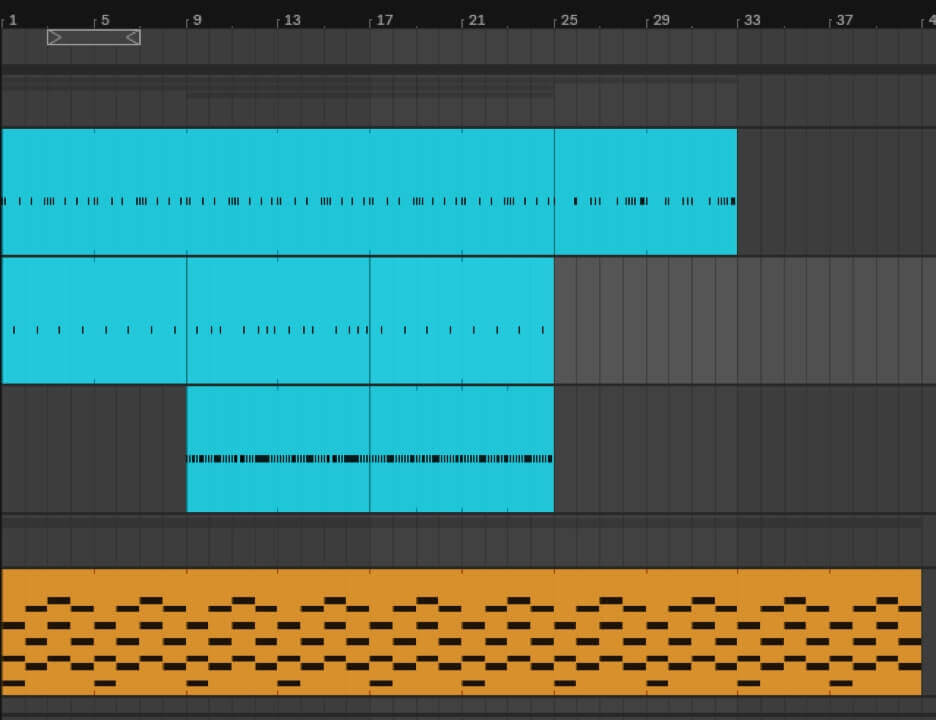
Now I’ll enter in the MIDI notes where I want the kick drum to play. After this I’ll do the same thing with the snare and hi hat in their respective tracks.
Remember, you can make different MIDI note patterns in the same track. I’m going to make a couple different drum loop patterns for each part of the song.
Composing the Bass
Now it’s time for the bass. We’ll do the same thing; open a plugin for the bass track, arm the track, and compose the MIDI track for it. I’m going to use a synth bass, again this will be from Massive.

Composing the Lead Synth
We do the same thing for the Lead Synth track as all the other instrument tracks. I’m using Massive again, but of course you can use any synth plugin you’d like.

Adding Additional Elements
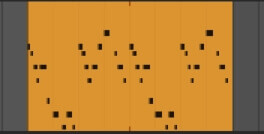
At this point, after playing everything through, I think I want to add another lead part to compliment the lead synth.
Now it’s time to arrange the sections of the track.
Arranging
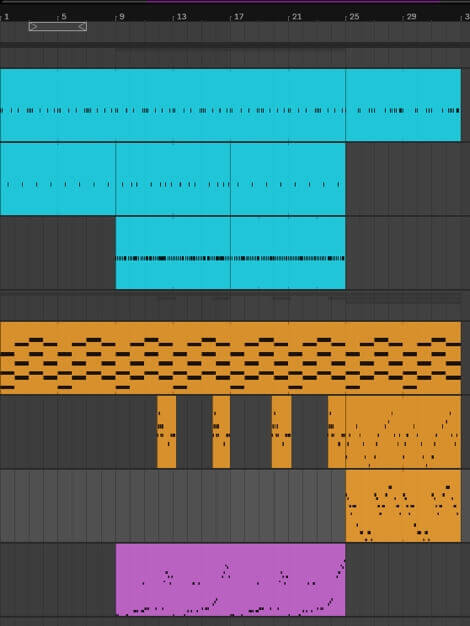
With arranging, all you do is duplicate and move the sections of MIDI around so they are arranged in the order that you want them. Here is what my full song looks like now, before arrangement:
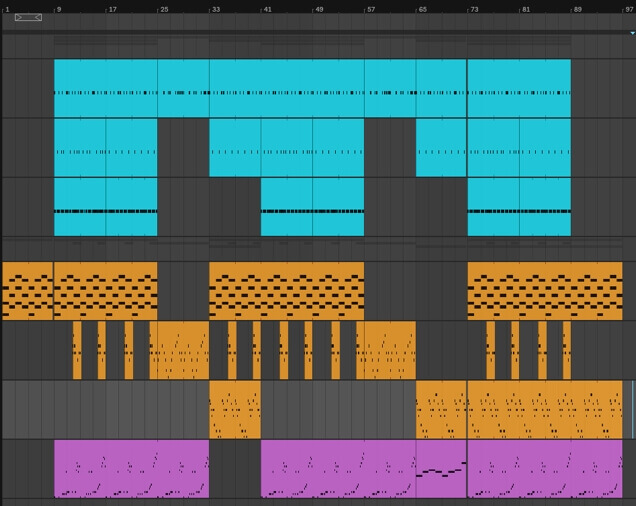
Here’s what my full song looks like after arranging it:
Mixing
Now for the mixing. We’re going to go track by track, first adding plugins to process the instruments, and then we’ll level the volume.
There are no hard and fast rules when it comes to mixing; there are some main guidelines you should follow (more on those in future posts) but for the most part, mixing is experimental, subjective, and the outcome depends on what you think sounds good.
Today with this project, we will do the following for most (if not all) tracks:
- Apply EQ
- Apply compression
- Apply reverb/delay/spatial effects
- Level the volume of all tracks using pink noise
Mixing the Kick
EQ
Let’s apply an EQ to the processing chain and play the song. With most EQ plugins, they will allow you to see which frequencies the sound is taking up in the spectrum.
Here we can see that a lot of space is being taken up in the low frequency area, as a kick drum should, and not much space is being occupied in the high frequencies.
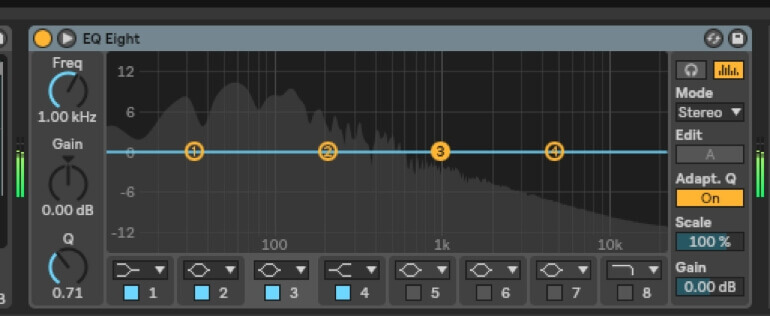
There are five main types of EQ filters:
- Low pass
- High pass
- Band pass
- Shelf (high and low)
- Notch
Today we’re only going to focus on low pass, high pass, and notch filters, but look out for some more in-depth articles on EQ in the future.
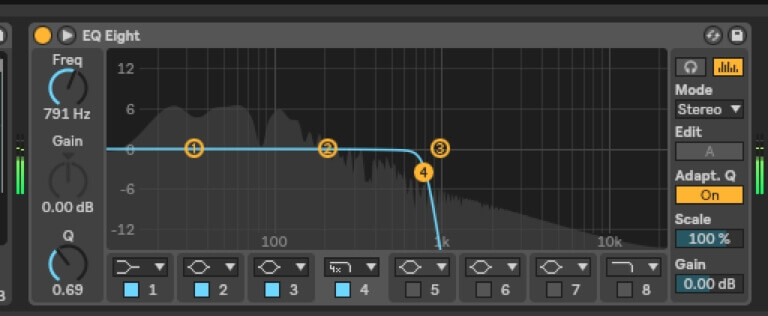
For the kick, we’ll be using a low pass filter. All a low pass filter is is an EQ curve that only allows low frequencies to pass through and be heard.
Because the kick doesn’t have much information in the high frequency range, we can take these high frequencies out to make room for instruments with a lot of high frequency information, for example the hi hat, since the kick’s high frequencies won’t be heard.
To mix the kick, create an EQ curve similar to this, dragging the curve so that it cuts out the majority of the high frequencies. Make sure you’re listening to the song while doing this so you’re not doing things blindly. Use your ear to determine where the cut off point sounds good to you. I chose this cut off point around 790Hz because that’s where it sounded good to me.
Compression
Typically, with any hip hop style track, the kick drum is very punchy and hard-hitting. This effect can be achieved with compression.
Compression can sometimes be a difficult concept for people to grasp, but the gist of it is that when a sound plays, depending on the settings of your compressor, compression will either boost the volume of the audio file or decrease/compress it once it passes a certain dB level. This can either cause the sound to have more punch, or add more sustain to it.
Some sounds don’t need compression, but in this case, the kick definitely does not have enough punch so I’m going to add in a compressor after the EQ.
Now, there are a few different components to compression:
- Threshold: the level of volume the sound must pass in order to get the compression to kick in.
- Ratio: determines how heavily the compression will be applied.
- Attack: determines how quickly compression will be applied once it reaches the threshold.
- Release: determines how long the compression will be sustained after the audio signal goes below the threshold.
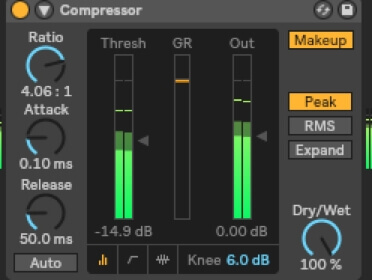
Add a compressor to your effects chain on the kick track and play the song. Set your compressor’s threshold to a level a bit below the peak dB of the kick.
From there, tweak your ratio, attack, and release to get the desired amount of punchiness you’re wanting to achieve.
For me, I’m going to set my threshold to around -15 dB, the ratio to around 4:1, and the attack at .10ms. I’m not gonna touch the release.
Mixing the Snare
EQ
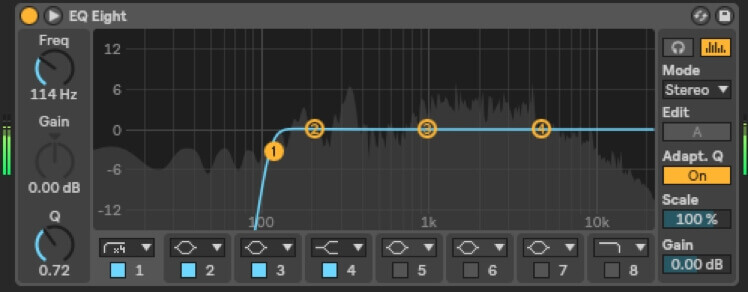
I normally don’t do much to my snare EQ aside from taking out any unnecessary frequencies. I’ll use a high pass filter for this because the snare doesn’t have too many important frequencies in the lower end of the spectrum.
I’ve dragged the EQ curve to a place where I hear too many frequencies being taken out, and then I drag it back down to a spot where I think it sounds good, around 100Hz.
Compression
As for compression, usually snares are snappy enough that I don’t think compression adds anything to them, but that’s just a personal preference. Keep in mind that not all sounds are created equal and that what could benefit one sound could make another sound bad.
Reverb
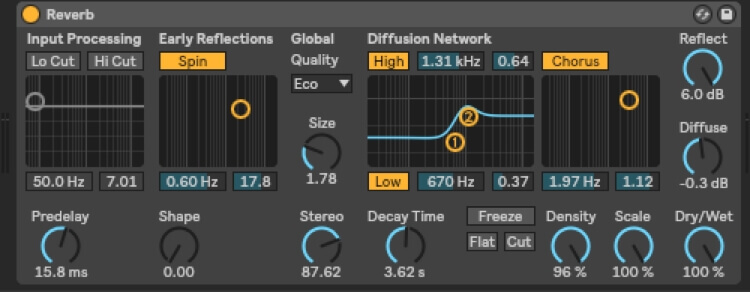
Although I’m not going to put any compression on the snare, I definitely am going to put a little bit of reverb on it to give it a spatial element.
Ableton has a default reverb set up upon opening a new project file, so I’m just going to use that because from my experience it’s pretty good. Feel free to use whichever reverb you’d like to use, and tweak its parameters to get the sound you’re wanting. I’m not going to be adding too much reverb to the snare, just enough to make it sound like it’s in an actual room.
Mixing the Hihat
EQ
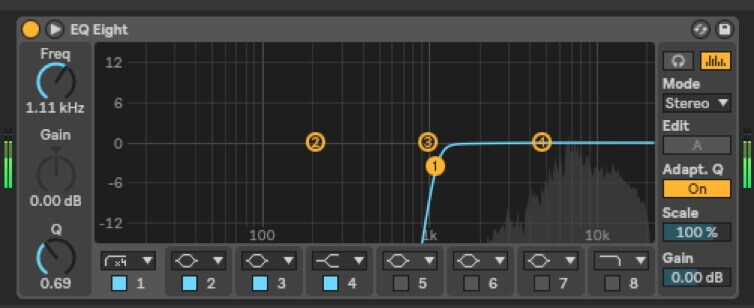
Considering a hihat has usually only high frequencies, I’m going to use a high pass filter.
Compression is pretty unnecessary here, so let’s move on to a bit of spatial effects.
Spatial Effects
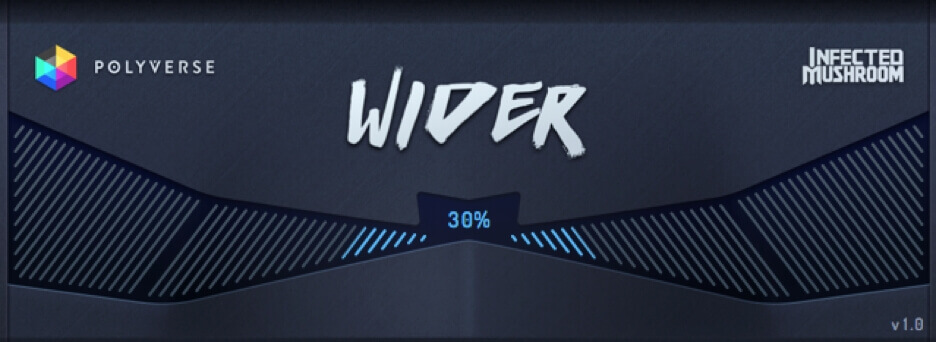
I’m going to add this third party plugin called Wider. Wider is a plugin made by Infected Mushroom that makes sounds sound wide (obviously) and gives them a quality that makes it seem like they’re in a bigger space than they really are, similar to reverb but without the reflections. Wider is available for free if you are interested in getting it.
Mixing the Pad Synth
All I really need for the pad synth is some EQ. It has enough sustain that I don’t need a compressor for it, and it has a wide sound to begin with so I feel as if reverb is unnecessary. If you prefer something different, go ahead and add your compressor and reverb or delay, etc.
EQ
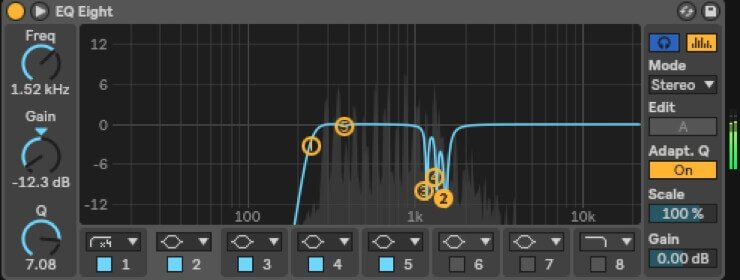
The sound that I’m using for my pad synth has a few harsh frequencies that I don’t really like the sound of, so for this EQ, I’m going to employ some notch EQ. Notch EQ is just a very very tight EQ curve used for taking out or boosting an extremely small range of frequencies.
If you have some harsh sounds and want to take out those frequencies that are hurting your ears, all you have to do is tighten up the Q of one of the EQ bands, raise it up 6dB or so, and then scan through the frequency spectrum as the song plays, and listen for those harsh sounds.
Once you find an area that has a frequency that’s bothering you, decrease the gain of that frequency band until it sounds okay.
While I’m at it, I’m going to also put a high pass filter on this EQ to get rid of some low frequencies that I feel are making the pad synth sound muddy. Here’s what the final result looks like:
Mixing the Synth Lead
For the synth lead, I’m going to do the same thing that I did with the pad and only use an EQ.
EQ
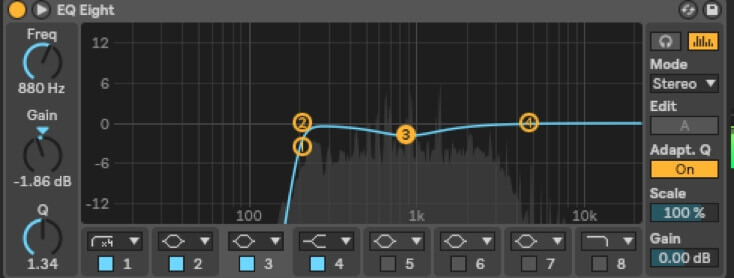
I’m not hearing any harsh frequencies so I won’t worry about notching anything out; for this instrument I’ll just take out the low end frequencies that I don’t need.
I’m also going to lower around the 1k range a little bit because there are a couple peaking frequencies, but they’re not very harsh sounding, I only want to tame them very slightly.
Mixing the Second Lead
This lead already has a lot of reverb and delay, and there’s a lot of sustain, so again I’ve decided to only use an EQ on it.
EQ
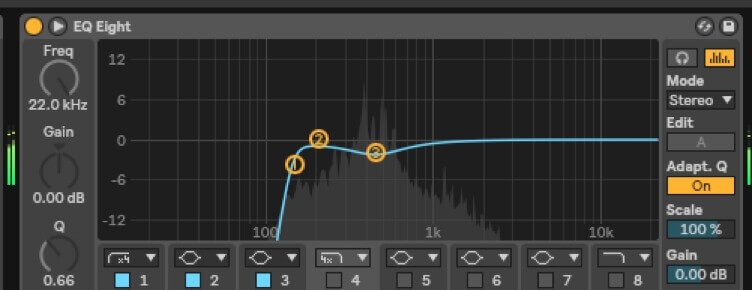
I’ve taken out the low frequencies to clean up the sound a bit because this lead sounds a bit muddy. I’ve also lowered a small portion of frequencies where some were peaking. Nothing too harsh.
Mixing the Bass
I really like this bass, so I want to keep as much of it in the song as I can and really make it stand out, but naturally it’s fighting against the kick drum because they occupy the same frequency range.
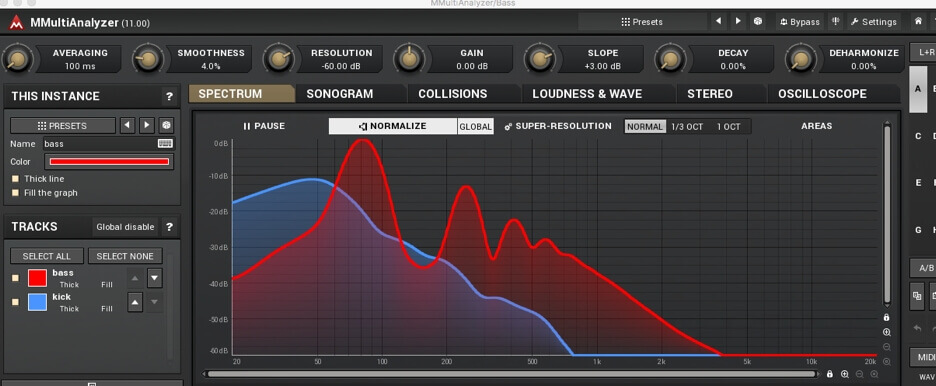
I’m going to use a third party plugin from MeldaProduction called MMultiAnalyzer to figure out where the two instruments are clashing the most often so that I can lower the gain of the EQ on one of those instruments so they both fit in the mix.
To do this, you simply add MMultiAnalyzer to the effects chain of each of the instruments you want to analyze, and from there you can give each instrument a color to differentiate from the two and then look at the graphs that show where the collisions are. Here we can see that things are mostly colliding in the 50 to 100Hz range.
EQ
I want to keep the sub frequencies in the kick (50hz and lower), so I’m going to EQ those out of the bass, and then I’ll lower a wider range of frequencies in the 50 to 100Hz area in the bass as well so the kick can shine through. I’m also taking out any high frequencies in the bass.
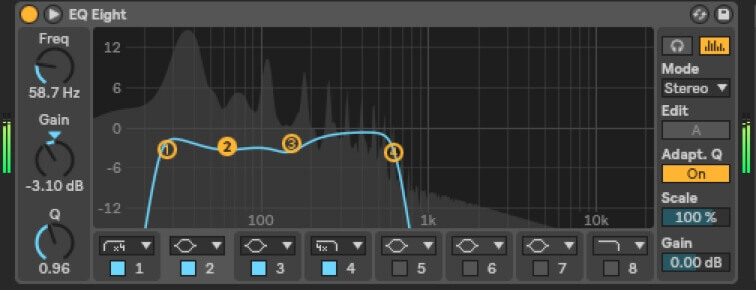
The kick is now coming through a lot better and I can still hear the bass.
Leveling the Volume
Now it’s time to level everything. A really nice trick I like to use is to mix with pink noise. Pink noise is great to use as a reference because unlike white noise, pink noise’s frequencies are all balanced.
With white noise, as the frequency goes up, it sounds louder, but with pink noise, the volume of all the frequencies is equal, which means it’s perfect for mixing with because it results in a balanced spectrum in the song.
To mix with pink noise, you can either use a pink noise generator like Pink by Credland Audio (it’s free to download), or you can just import an audio file of pink noise into your DAW.
I’ve loaded Pink into my master track and it’s playing at -10dB which will give me a good amount of headroom to avoid clipping. The next step is to bring the volume of the tracks all the way down.
Once that’s done, play the song and bring up each track individually. You should bring up the volume so that the instrument can be heard just barely above the noise, but not so much that it’s hidden.
Go through every track and do this, you might need to solo the pink noise and the instrument at points if you’re struggling to hear. The frequency spectrum of your final song should look something similar to this:
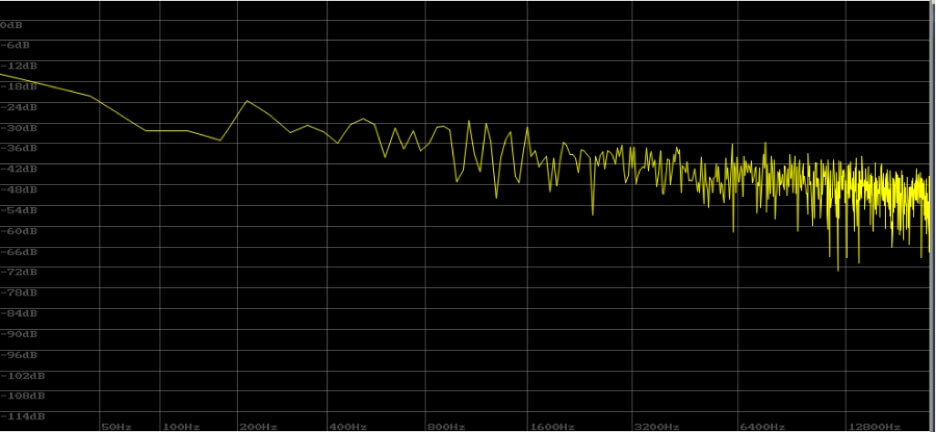
Now, even though pink noise is great for mixing a balanced song in terms of frequency, it doesn’t mean that the song is mixed nicely in terms of emotion and feeling.
So once you’re done mixing with pink noise, listen to the track again and make any adjustments to volume if you think something is too loud or too soft.
Exporting
Once you’re satisfied with your mix, it’s time to export the track so you can go to the next step: mastering. Export the song as a WAV file.
Mastering
A lot of producers think mastering is an extremely difficult process. In some cases, it can be. But all mastering is turning up the volume of your completed song to the industry standard level according to various streaming websites.
A mastering engineer might also make a few other tweaks, like adding a final EQ or compressor on the whole track to glue it together some more, but aside from that, it’s not too difficult to figure out how to do.
Of course you’ll need to develop an ear for mastering to create a very polished, professional sounding track. With practice comes success.
For this track, I’ll open a new project file and drag the previously exported song into it. Next, I’ll load iZotope Ozone onto the master track.
Ozone has a helper tool that you can use if you’re a beginner, but I’ve found that sometimes it’s neither helpful nor accurate. I’ll tell you what I usually do that I’ve found works fine for a beginner.
- EQ (to touch up the final frequency spectrum)
- Limiter (to raise the volume to the industry standard level)
- Stereo Imager (to give the song a final polished feel in terms of space)
I’m going to set up Ozone with an EQ, Maximizer, and Imager.

EQ
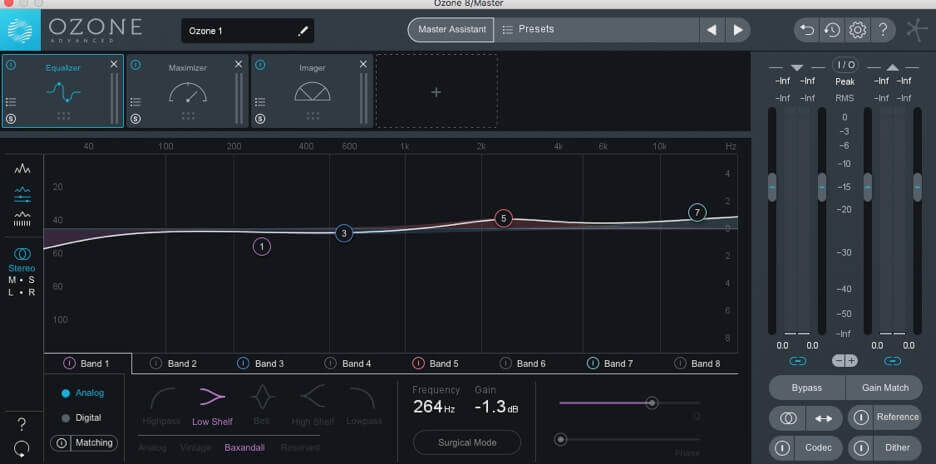
Remember, when mastering, you should only be changing things very subtly. If you have to raise or lower a frequency range by 6-10dB, you should go back into your mix and fix the problem there.
Play the track and raise or lower some of the frequency bands and experiment with the sound. Raise or lower the bands by only 1-2 db. Stop when it sounds good to you.
This is what my EQ for this song looks like:
Limiter
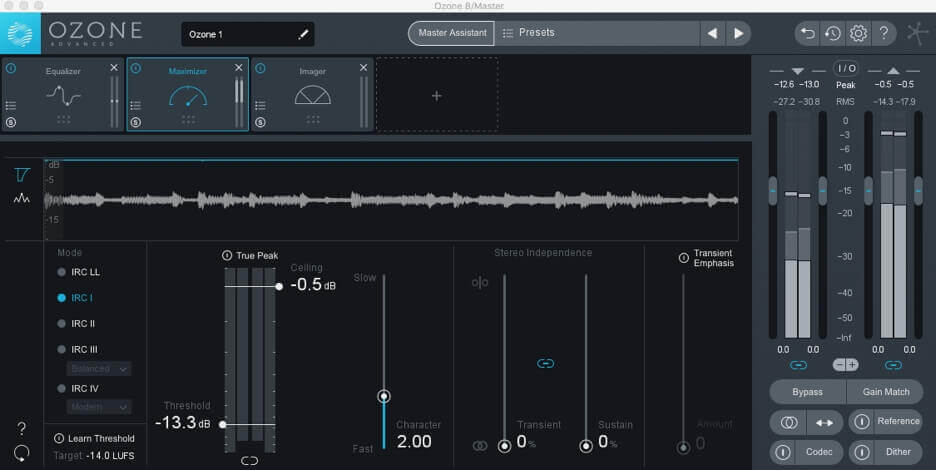
The limiter (called Maximizer in Ozone) is like a compressor but more extreme, and it allows you to raise the overall volume of the song without having the peaks clip. There’s a top volume level, called a ceiling, that you set, and the limiter will not allow any sound to go over the ceiling.
In the case of Maximizer, there is a threshold and a ceiling. The threshold determines when the limiter kicks in, and the ceiling is the very highest level of volume that is allowed to come through.
For industry standard volume levels, it depends on what streaming website you’ll be using. For a beginner though, you don’t really need to worry about it. If you want, however, Ozone has a tool in Maximizer that listens to the audio as it’s played and sets the threshold so that the song volume is at -14 LUFS, which is a common level in the music industry.
Here’s what my settings in Maximizer look like:
Stereo Imager
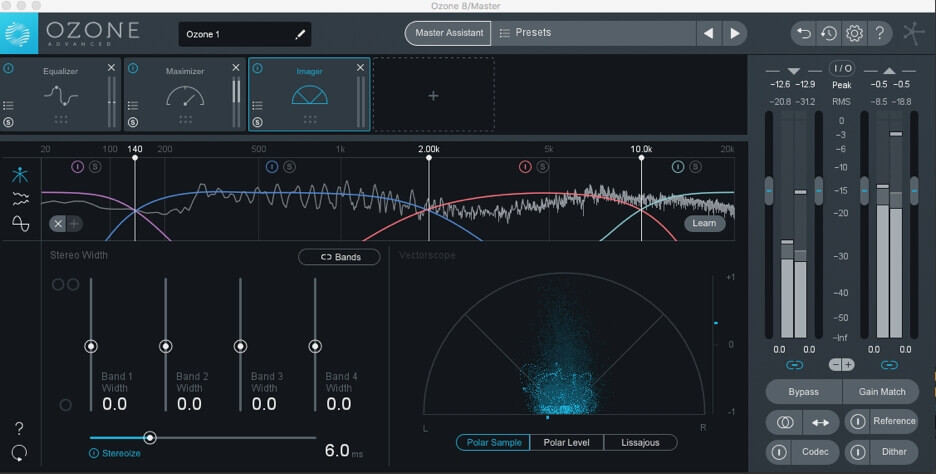
Ozone’s Imager tool allows you to give certain frequency ranges different amounts of wideness and space. Play around with it until you get it sounding how you want it to.
Normally I just stick with the Stereoize function and don’t bother messing around with the wideness of the different frequency bands.
The Final Export
All that’s left to do is export your song one more time and then you’re done!