Consordinis articles are written by musicians who independently research, test, and recommend the best instruments and products. We are reader-supported. When you purchase through links in our articles, we may earn an affiliate commission.
Akai’s MPC, in its numerous forms, is arguably one of the most iconic pieces of music production equipment we have seen since being introduced in 1988. Despite securing legendary status over the decades, not every new addition to the MPC family has been met with universal acclaim.
Recent years have seen Akai go back to their roots, focusing on standalone models like the MPC X and MPC Live, much to the delight of producers everywhere.
The latest addition, the MPC One, is said to be an entry-level unit with advanced features beyond its price point. With the MPC X and Live being so successful, is this hybrid of the two necessary? Is it worth it? Let’s find out.
Overview
Coming in under $700, the MPC One is the cheapest of the standalone MPC units, which brings some good news and some bad. The obvious upside is that it’s significantly less expensive than Akai’s other most portable standalone model, the MPC Live. The bad news is that while it’s more budget-friendly, it understandably comes with some restrictions. Akai has taken only the essential features from the MPC X and Live to create this compact music production center.
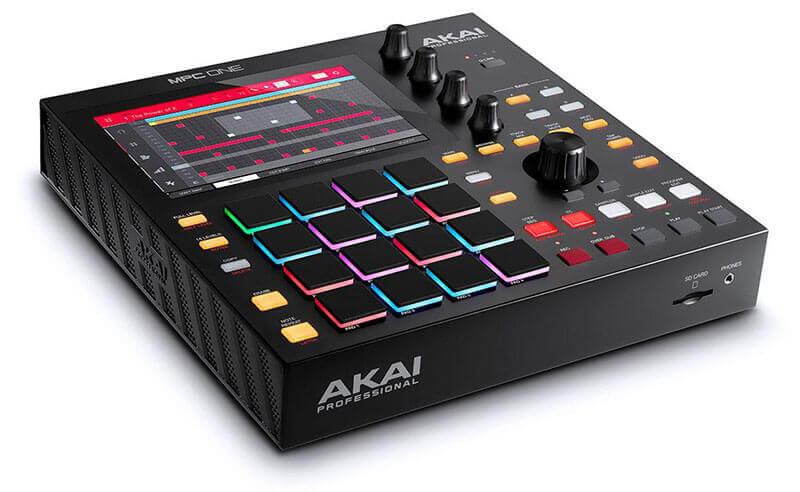
We never talk about an MPC without mentioning how good the pads feel, and it’s the same this time, albeit with one noticeable difference. The MPC One has the full 16 pads, but they are slightly smaller than usual to suit its smaller size. One of the main reasons that Akai decided to go with smaller pads was to accommodate the full-size 7-inch multi-touch screen. The 7-inch touchscreen is vital in terms of maintaining the same speedy workflow as the MPC Live, and something that Akai didn’t want to sacrifice.
Along with the touch screen, the MPC One has four Q-Link knobs, dedicated function buttons, 2 GB RAM, 4 GB of storage (2 GB of onboard content, and 2 GB of user memory), and CV/Gate connectivity.
The MPC X is a production powerhouse, and the MPC Live has been a massive hit in the studio and on the stage, so where does the MPC One fit into the mix? The simple answer is that it’s a cheaper alternative to the MPC Live, but it goes far beyond that. It offers things that previously only the flagship MPC X offered, so the decision between Live and One isn’t purely financial.
A portable package
Despite being the cheapest of the standalone MPC units, it bridges the gap somewhat between the MPC X and Live. The MPC X isn’t too much hassle to carry to a gig; it is lighter than most gear musicians are used to carrying. However, it’s not the kind of thing you throw in your bag and take around with you in case you suddenly feel inspired. The MPC Live is the kind of thing you can throw in your bag and take anywhere, but it lacks some features of the MPC X.
The aim of the MPC One is to provide the most used features of the X and Live in a very portable unit. All the while, trimming enough unnecessary features to keep it affordable.
The MPC One is square rather than rectangular like the MPC Live. It comes in at just 10.7 inches wide, same in height, with a depth of 2.1 inches, so it’s compact enough for your backpack. The one thing missing to make this MPC a true play anywhere device is a rechargeable battery. Akai chose to leave out the rechargeable lithium battery found in the MPC Live as a way to keep the price down.
Sure, it would have been nice to have the option of going battery powered. The idea of taking your MPC out and making a beat in the park on a summer day sounds idyllic, but realistically, it’s not essential.
Same operating system as the MPC X and Live
The MPC One runs the same MPC software as the X and Live. If you aren’t yet familiar with the MPC software, here is a quick breakdown of how it works.
You begin by creating a new project like you would do in any DAW; a project consists of sequences, tracks, and programs. The MPC software has multiple views/screens, which are easy to navigate once you get the hang of it. The bulk of your time will be spent in the main view where you choose your settings for sequences, tracks, and programs.
Sequences can be an intro, verse, hook, or even a complete track. From the sequence tab, you can name your sequence, set the tempo, number of bars, and start/end beats.
Right below that is the tracks tab where you select the type of track that you need. There are six track types available, which are drums, plugin, keygroup (sampler), clips, MIDI, and CV. Once you choose a program type, let’s say drums to keep it simple, it’s time to choose your sound.
The last tab at the bottom of the main view is the program tab. To select a sound, press the browse button to open up your browser, and you’ll see drums, instruments, samples, my files, demos, and Splice. Let’s say you want to start with a kick drum, select drums, and you’ll see a list of kits to test. You can also select expansions and choose sounds from specific expansion packs, like the MPC One bundle or any you purchased.
Lastly, if you have a particular style in mind, like a deep club kick, you could type club in the search bar and get a list of suitable options. You can preview sounds and kits before loading them into your project. If you come across a sound that isn’t quite right, but it might be useful later on, you can still load it into your project where it will stay and be quickly recalled from the main view when needed, without the need to revisit the browser.
Once you have your kick down, you can make track two a snare, track three your hi-hat, and so on, or whatever you choose. Sounds can be recorded in real-time or in step sequencer mode; it’s common to go between the two. That’s a basic outline of how to make music with the MPC One, but it’s far more sophisticated than a basic step-sequencer, so we will expand on it as we go on.
Standalone performance and production
Standalone, all in one box units are where it all started for the MPC; it wasn’t till 2012 that Akai created MPC’s as controllers. The ability to use your MPC without a computer is a massive part of why the MPC X and Live are so successful. Following that trend, the MPC One offers standalone or controller modes.
In standalone mode, you can work entirely within the MPC unit via Akai’s MPC DAW software. All you need are some headphones or speakers as an audio output source, and you are good to go.
Working in standalone mode gives you 128 tracks of MIDI, CV, plugins, and so on with eight tracks of audio. Like working with a computer and a DAW, the more you add to a project, the harder you push the RAM. Although, you really need to work hard to get the MPC One to show any signs of slowing down. Whether you are a solo performer or part of an ensemble, you should never run out of space to work.
Standalone mode enhances several aspects of the MPC, first of all, it makes it more portable because you don’t need to carry extra equipment with it. Secondly, it enhances your production workflow because you don’t need to go between the MPC hardware and a laptop, you stay in your zone. Thirdly, it gives you a streamlined live performance setup without losing quality or versatility.
Sometimes in standalone mode, you might create something that you later want to export to your DAW and finish there. There are multiple ways to export your project, including exporting stems or our favorite, exploding your tracks. Exploding your tracks will bounce every individual sound into its own track, ready to be mixed in your DAW.
7-inch multi-touch screen
The MPC One houses exactly the same 7-inch multi-touch screen that’s found on the MPC Live. This time the screen is positioned above the pads rather than to the side. Akai developed this screen for the latest MPC units, and it is one of the most responsive and accurate touch screens you will ever use.
The decision to take up so much surface space with the full-size screen is shown to be a good one, especially in standalone mode. The intuitive multi-touch screen is what lets you make simple and complex edits quickly and accurately. It’s also how you can navigate all areas of the MPC software easily in combination with the master encoder with push selection.
The screen is multi-touch and multi-gesture, so not only can you make selections, but you can scroll, zoom in and out, etc. The versatility of the touchscreen shines when you start to go beyond the main view of the MPC software.
Grid view
Grid view is where you can see a visual representation of your recorded MIDI regions in piano roll form. At a glance, it’s pretty standard, but the speed you can work at when compared to using a mouse or trackpad. When in grid view, you will see some parameters buttons along the bottom of the screen like nudge, edit start/end, transpose, and velocity.
If you want to move any of your midi regions, like pushing the snare a little, you can highlight every snare by pressing the corresponding note on the screen or select individual hits by dragging your finger over them on the screen. Once you have the correct regions selected, use the encoder to move them, either snapping to the nearest beat or move freely by turning off the snap. It’s a straightforward thing, but it feels incredibly natural working in this way.
Track view
Track view is just what it sounds like; it displays all of the tracks in your current sequence and separates MIDI and audio tracks. Each track is shown by title, program, with level, mute, solo, and pan controls. MIDI tracks also have transpose options.
Step sequencer view
The step sequencer is wonderful yet very simple to use. To get started, you need to select the pad/sound that you want to program, which you can do using the touchscreen, but the fastest way is just to hit the pad you want then press the step-sequencer button.
When the step-sequencer is engaged, the 16 pads represent 16 steps, pressing a pad will add the selected sound to that step. You can also add steps via the touchscreen, but using the pads for this is a bit faster. Inside the step sequencer view, you have the option to show up to 64 steps at a time.
Now, here comes the cool part; when you put your steps in, you will either have them set full velocity or determined by the pressure you applied to the pads. Either way, you will want to go in and edit some levels to add dynamics to your track. Changing velocity can be done by dragging the bar up or down on the touchscreen. But, if you have something that often occurs, like a hi-hat, and you want to create a velocity curve, you can drag your finger across the screen, intuitively creating the arch/curve that you want. It’s genuinely surprising how accurate it is.
XYFX pad view
The X/Y pad is a fantastic way to automate effects to your recording or bring new life to your live performance. It works by moving your finger around an X/Y axis to apply the selected effect, which ends when you remove your finger. The X/Y axis is locked into a grid so you can go crazy and create unexpected results, or you can be very accurate using the grid. Multiple effects can be mapped onto the X/Y grid, like filters with note repeat, delay, ring modulation, and more.
To give an example, let’s take a house track with a four to the floor kick and a nice snappy clap. If you set the X/Y pad to LPF (low pass filter) with note repeat, you have a quick way to add drops to your beat. Moving up or down will change the cutoff position of the filter while moving left and right will decrease and increase the repeat rate.
Now let’s say you’re on stage and want to add some excitement to a sequence that is stagnating a little. Place your finger near the bottom of the grid, so you’re cutting out all the mids and highs, getting that underwater style sound that lo-fi fans love. Start with a reasonably average repeat speed, then slide your finger to increase the repeat rate and the cutoff position, bringing all frequencies back in gradually. If you get it right, you’ve just created an epic drop out of nothing.
There are lots of cool ways to make use of this feature, whether in the studio or on the stage.
Controller mode
Working in controller mode isn’t a million miles away from working in standalone mode. The difference is that you are connected to a laptop, and the MPC software has expanded capabilities. When in controller mode, you have the same 128 tracks of MIDI, plugins, CV, VSTs, but you now have 128 audio tracks available rather than the eight audio tracks of standalone mode.
If you are working from the laptop/desktop, you can work entirely with the MPC software, or you can open it as a plugin inside your DAW, like Logic Pro X, etc. Some people prefer to work with the MPC as a plugin inside another DAW; it has to be said that the MPC software has improved tremendously over the last couple of years. It now has a user interface that is much closer to that of the industry-standard DAWs.
The thing we love most about controller mode is that you can still work almost entirely from the MPC One. When connected to your computer, you have access to all of your 3rd-party plugins and VSTs directly from the MPC’s touchscreen. So, you don’t actually need to change the way you work to get the benefits of controller mode. You can almost forget about the computer once you are connected, and continue as if you were in standalone mode.
One of the things that Akai did a great job with is the transition from controller mode back to standalone. We discussed the benefits of not needing to take a computer with you to perform, but you won’t have all of those 3rd-party plugins and sounds any more.
The smart solution that Akai came up with is their bounce to audio tool that can be used when saving your project. When you have finished your project in controller mode, pick out the tracks that use 3rd-party plugins and choose bounce to audio, then save your project.
Now, when you reopen your project in standalone mode, the original MIDI data tracks will still be there, but they will be muted, and new audio tracks will be added. So, you now have the work you created with the 3rd-party plugins in audio form for playback during a performance, and the audio can be manipulated in endless ways.
Connectivity
Connectivity is one of the areas where the MPC One that had many people excited about the MPC One. The main reason is the addition of CV/Gate outputs that were previously exclusive to the flagship MPC X.
Starting with the back panel, you’ve got 1/4-inch stereo main outs and 1/4-inch stereo ins, so you can sample directly into the MPC One. It also has 5-pin MIDI in and out for controlling external MIDI. Above the MIDI ports is the exciting bit, four TRS CV/Gate (up to eight CV out) jacks open up the world of modular gear for the MPC One. It has USB A/B ports for controller mode, USB MIDI controllers, and storage via external hard drive. Lastly, there is an ethernet connection that lets you use Ableton Link and create a network between the MPC and your Splice account.
On the front panel, there is a full-size SD card slot for extra storage options and a single headphone jack (1/8-inch).
With the addition of the CV outs, you can use the MPC’s sequencer to trigger any aspect of your modular gear. You can even use the onboard Q-Link encoders to open/close filters or edit parameters. As well as basic control, you can use features like note repeat when triggering a sound from an external modular synth. The idea is that you bring your favorite modular gear into Akai’s world of intuitive, tactile control. If you do want more than pads and knobs to control your modular patches, you can add an external MIDI keyboard, too.
The CV outs come at the expense of an AUX out, and the MPC One has fewer MIDI ports than the Live.
Built-in synths
When choosing your track type, one of the options that we mentioned was plugins. Plugins are where you will find the MPC One’s three built-in synths, Bassline, Electric, and TubeSynth, all coming from Air Music Tech. Between the three synths, you’ve got everything from fat sub-bass tones, organ bass, Rhodes, and wurly’s, right through to moogish leads.
For certain sounds, using an external MIDI keyboard, like the MPK Mini mkII, might be the best option. But, if using the pads, you can go into notes mode, which allows you to set up your pads in different ways. By default, the pads will trigger notes chromatically, but you can set the pads to stay locked into a specific scale. That way, there aren’t any bum notes, and it makes finding lines or riffs easy. You can even switch from single notes to chords within the chosen scale with the ability to change voicings. Using the pads for chord progressions is great because it often inspires progressions that you wouldn’t naturally go to on a keyboard.
Onboard content
The MPC One comes packed with 2 GB of exclusive sound content from some of the best sound designers in the industry. Included with the MPC One are samples, loops, and instruments from Rawcutz, F9, Decap, and more. There is more than enough onboard content to start making any style of music right out of the box.
On top of the included content, you have the option to link your desktop Splice account to your MPC and access your entire Splice library.
Sound design and mixing
People often separate hardware like the MPC One from serious sound design, assuming it’s limited to assigning stock sounds to pads. The reality is that it goes quite some way beyond just stock sounds and samples. When you load a program, let’s say a drum kit, again to keep it simple, you can insert effects on the entire kit or individual sounds. Up to four effects can be assigned per program or per sound.
So, you can take a basic acoustic snare, play with some effects, and come up with your own custom sound. You can also layer up to four sounds on one pad, maybe adding a hi-hat under a kick to give it a little more bite.
Plugins can be layered on pads along with sounds/samples to create something unique. Once you have your sound, select the flatten pad option, and the MPC One will then resample the pad, converting all of your layers into a single new sound. The possibilities are endless if you want to take the time to build your own kits and sample packs.
There are a few ways to approach mixing your tracks with the MPC One. Many people will prefer to mix inside their DAW because it’s what they are used to, and that’s fine. As we mentioned already, exporting your project as stems or individual tracks is easy.
The number of artists who want to produce music without a DAW is growing every day. So, for those of you who fall into that category, you’ll be glad to know you can mix your work comprehensively in standalone mode. The MPC One’s channel mixer lets you do everything that you’d expect to do when mixing inside a DAW. Basic things like levels, panning, EQ, compression, and adding insert effects with full control of parameters are all there.
The explode tracks function isn’t limited to exporting your work either, so if you record drums and samples on one track, you can explode tracks inside the MPC One before you start mixing.
To take it one step further, you could go into controller mode with your laptop, and mix with your fave 3rd-party plugins directly from your MPC.
Workflow
One of the main reasons for buying any MPC unit is for the smooth workflow. The MPC One has the same speedy workflow but enhances it further with its 32 tactile/dedicated buttons. Many of the MPC’s most used functions now have dedicated buttons so you can get there even faster. A single button can access core functions like notes mode, track mix, or sample edit. Most buttons have a secondary function, which can be triggered by holding shift or double-tapping the button. For example, the sampler/looper button, press once for the sampler, twice for the looper.
Adding this new tactile approach to the existing workflow with the multi-touch screen, and Q-Link knobs is a genuine time saver.
The Q-Link knobs don’t have the OLED displays of the MPC X, but they do automatically change function depending on what is engaged on-screen at the time. It’s intuitive touches like that, that help you stay in the zone, and of course, they are assignable when need be with four banks.
The workflow with the pads, in terms of how many kits/sounds you can pre-map is huge. There are eight pad banks per program, so if you are playing live, you could get through a set with a single project if you wanted to.
MPC One or MPC Live?
We said earlier that the decision between these two machines wouldn’t be purely financial. The MPC One is substantially cheaper, but that’s far from being the only difference, although it’s the biggest one.
The other significant differences are that the MPC One has CV/gate connectivity, and the MPC Live doesn’t. Then the MPC Live has a rechargeable battery, but the MPC One doesn’t.
So, here’s our advice, if you already own an MPC Live, then don’t even consider buying an MPC One unless you need the CV/gate outs. Everything else is possible with the MPC Live, so you are good to go. If you already own an MPC X, then the MPC One is still a good investment if you need a more portable unit.
Now, in the most likely scenario that you don’t own either yet, we favor the MPC One. The reason we prefer MPC One is that the lower price and CV/gate outs outweigh the benefit of the rechargeable battery and any other small differences.
- Entry-level price.
- 7-inch multi-touch screen.
- CV/Gate outs.
- Dedicated/tactile buttons.
- Comprehensive functions.
- Standalone production/performance.
- Extremely portable.
- Slightly smaller pads.
- No rechargeable battery.
Verdict
The MPC One looks set to be a success. Having such a low price sets it apart from the competition when you consider how much bang you get for your buck. There are some cutbacks to keep the price low, but all of the important stuff is still there.
It’s going to be a fantastic introduction to standalone production for beginners, and it will let pros do what they do even faster. So, if you are an experienced producer, don’t be fooled by the entry-level price and quick-navigate buttons, the MPC One is no toy, it’s the real deal.